If you sell skincare online, you already know the product photography problem is different from almost every other category. A t-shirt is forgiving. A candle is forgiving. A serum bottle in frosted glass with a chrome dropper cap and a printed label is not. Every surface behaves differently under light, and what works for one catches glare badly on another. Getting it right in a professional studio takes specialized setups, polarizing filters, and hours of micro-adjustments per shot.
The good news is you can photograph skincare products at home and still get results that are clean, consistent, and listing-ready – without any of that. You need to understand what actually makes skincare photography hard, build a setup that solves those problems cheaply, and know which camera settings make the difference on packaging-heavy products. This guide covers all three.
Why Skincare Photography Is Harder Than Other Product Categories
Most product photography guides treat every product the same. Skincare photography is actually one of the most technically demanding categories in e-commerce, and understanding why helps you solve the problems before they show up in your shots.
The core challenge is material conflict. A typical serum bottle combines three or four different surface types in one small object: transparent glass, a frosted or matte finish on the body, a chrome or metallic cap, and a printed paper or plastic label. Each material absorbs and reflects light completely differently. A lighting setup that shows the glass beautifully will blow out the chrome cap. A setup that handles matte surfaces well can make glass look flat and lifeless.
The second challenge is color accuracy. A customer ordering a cream with specific packaging color – say a matte sage green jar – expects the product that arrives to match what they saw in the listing photo. Cosmetic photography lighting that shifts warm or cool can misrepresent the product’s actual finish, which leads to returns and lost trust. Label text that appears crisp in real life can look washed out, distorted, or illegible in a shot with the wrong lighting angle.
The third challenge is consistency. You are not photographing one product – you are photographing a line. Your serum, toner, moisturizer, and eye cream need to look like they belong together on the same shelf. Getting that consistency without a controlled studio environment requires a repeatable setup, which is most of what this guide is about.
What You Need to Photograph Skincare Products at Home
None of this requires specialist equipment. Here is what actually matters:
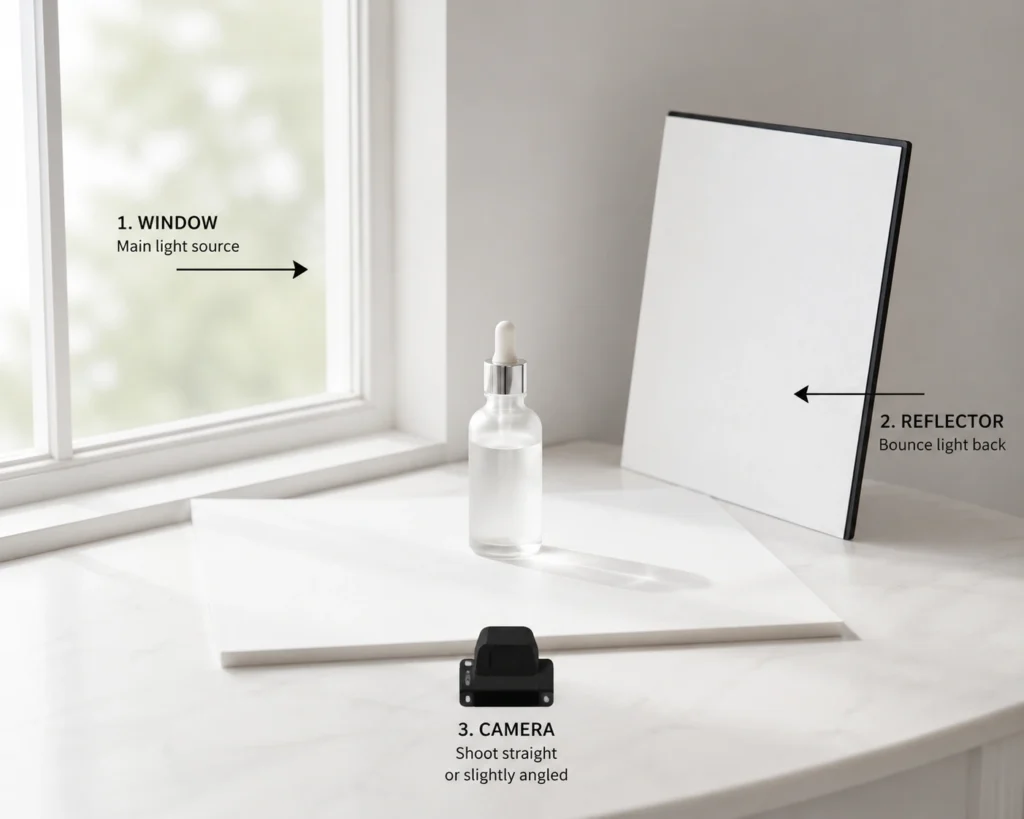
- A window with indirect daylight. North-facing windows are ideal – they give you soft, consistent, shadow-free light without direct sun. If your window gets direct sun at certain times of day, wait until the sun has moved off it, or diffuse it with a white curtain or sheer fabric.
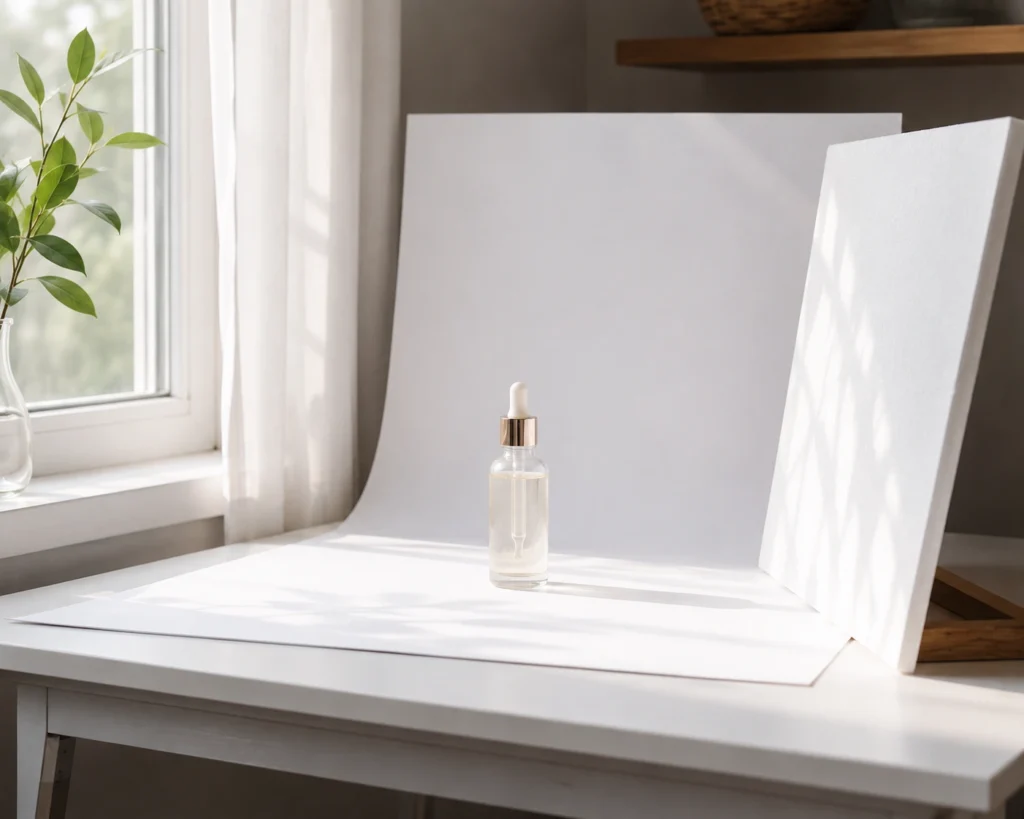
- A white paper sweep or poster board. This is your background. Curve it gently from vertical to horizontal so there is no visible horizon line where the table meets the wall. A $3 sheet of white foam board from a craft store works perfectly for most single-product shots.
- A white foam board or card for your reflector. Place it on the opposite side of the product from your light source. This single piece of card is responsible for filling in the shadow side of your product and eliminating the harsh contrast that makes cheap photos look cheap.
- A small piece of black card or black foam board. This sounds counterintuitive, but a small black card placed just outside the frame on the glass side of a transparent bottle creates a dark reflection in the glass that reads as depth and richness. This is the single technique that most separates flat-looking glass photography from professional-looking glass photography.
- A tripod or stable surface for your phone. Not optional for skincare. The combination of close-up distances and the need for consistent framing across multiple SKUs makes handheld shots unworkable once you have more than two or three products.
- A lint-free cloth or cotton gloves. Before every shot, clean your products. Fingerprints are invisible in person and enormous in a close-up photo. This step saves more editing time than any tool you can buy.
Step-by-Step: Building Your No-Studio Skincare Setup
 skincare product photography setup with window light and white backdrop, no studio" class="wp-image-115" style="width:1100px;height:auto" srcset="https://cms.monoshoot.com/wp-content/uploads/2026/06/photograph-skincare-products-at-home-setup-1024x819.webp 1024w, https://cms.monoshoot.com/wp-content/uploads/2026/06/photograph-skincare-products-at-home-setup-300x240.webp 300w, https://cms.monoshoot.com/wp-content/uploads/2026/06/photograph-skincare-products-at-home-setup-768x615.webp 768w, https://cms.monoshoot.com/wp-content/uploads/2026/06/photograph-skincare-products-at-home-setup.webp 1402w" sizes="auto, (max-width: 1024px) 100vw, 1024px" />
Step 1: Choose your time of day. The best natural light for skincare photography at home is in the two to three hours before the sun becomes fully overhead – typically before 11am – or after 4pm when the light softens again. Midday sun through a window creates hard shadows that are difficult to fix in editing.
Step 2: Set up your sweep. Position your table at 90 degrees to the window, not in front of it. Tape your white paper so it curves up against the wall behind your product – this creates the seamless, shadowless background that makes product shots look professional. Keep the product close to the front of the sweep rather than pushed back toward the wall, which keeps the background bright white rather than grey.
Step 3: Position your reflector. On the opposite side of the product from the window, prop your white foam board at an angle so it bounces light back across the product. The closer you bring it to the product, the more it fills in shadows. Start about 30cm away and adjust from there.
Step 4: Add your black card for glass products. If you are shooting anything transparent – a glass serum bottle, a dropper, a clear tub – place a small piece of black card just outside the camera’s field of view on the glass-facing side. It creates a clean dark reflection inside the glass that gives it visual depth. Without it, transparent glass on a white background often reads as shapeless.
Step 5: Clean and stage your product. Wipe the product with your lint-free cloth. Remove any stickers not meant to be in the final shot. If your product has a dropper, fill it to a photogenic level or clean any dried residue from the tip. Align labels so they face the camera squarely – even a few degrees off reads as sloppy in a close-up.
Step 6: Take a test shot and look at the label. The label is the hardest thing to get right in skincare photography because it sits on a curved surface next to reflective materials. If the label is washing out, your light is too direct – move the product slightly further from the window, or add more diffusion. If it is too dark to read, bring your reflector closer.
Camera Settings That Make the Biggest Difference
- Turn off flash. This is non-negotiable for skincare. Flash on a glass bottle creates a single, harsh hotspot that sits directly on the glass and cannot be removed in editing.
- Lock focus and exposure together. Tap on your product in the camera app, hold until the AE/AF lock indicator appears, then compose and shoot. On reflective packaging, the camera’s auto mode will keep hunting for a new exposure every time light bounces off the chrome cap, resulting in inconsistent shots across the same product.
- Use 2x optical zoom rather than moving closer. Getting physically close to a small skincare product distorts its shape – makes bottles look wider at the base, narrows the cap. 2x zoom gives you the close-up detail without the distortion.
- Shoot at the product’s natural height. For tall, vertical products like serums, toners, and mists, shoot straight-on at the height of the product’s mid-point so the label faces the camera without distortion. For flat products like cream jars and compacts, shoot from a slight angle above – around 30 to 45 degrees – so the lid and label are both visible. Going directly overhead on a jar makes it look like a flat disc with no dimension.
- Check white balance before every session. Under warm LED bulbs, white packaging photographs yellow. A white jar that looks yellow in a listing photo immediately signals “cheap” to a buyer who cannot touch the product. Shoot near a daylight window and your white balance will take care of itself. If you are shooting under artificial light, set white balance manually rather than trusting auto.
- Use burst mode or a timer for close-up shots. The closer you are to a product, the more visible any camera movement becomes. A two-second timer or a Bluetooth shutter remote removes the shake from pressing the screen.
How to Photograph Different Skincare Packaging Types
Serum and dropper bottles: Shoot straight-on with 2x zoom. Position the black card to the left or right of frame to create a clean dark reflection in the glass. Angle the dropper slightly – either fully extended or resting at a natural angle on the lid – rather than leaving the cap awkwardly half-on.
Cream jars and pots: A slight downward angle of around 30 to 45 degrees shows both the lid branding and the product form. Include a second shot with the lid open and a small amount of cream scooped to the edge – this texture shot consistently performs well for moisturizers and face masks because it answers the buyer’s question about what the product actually looks like.
Mists and pump bottles: Shoot these upright and straight-on. If the bottle is transparent, use your black card technique. If it is opaque, focus tightly on the label so the brand name is sharp and readable.
Multi-product flatlays: For skincare flat lay photography, arrange products in a loose triangle or diagonal grouping rather than a straight line. Vary heights using a small riser under one or two products. Add one or two simple props – a few dried botanicals, a piece of linen fabric, or an ingredient that references the formula – but keep them secondary to the products. The product is the subject. Props are context.
Backgrounds That Work for Skincare Photography at Home
White is the safe default and what most marketplaces expect for main listing images. But for social, lifestyle, and secondary images, skincare products respond well to a handful of other backgrounds depending on their formula and positioning.
Marble contact paper (available at any home store for a few dollars) photographs as real marble and works well for premium, science-forward skincare. Linen or cream fabric gives a soft, natural feel that suits organic and botanical brands. A concrete tile or slate works for clinical, minimalist packaging. A bathroom vanity or wet stone surface instantly contextualizes the product without requiring a full lifestyle shoot.
Whatever you choose, use the same background consistently across your entire line. Inconsistency in backgrounds is what makes an otherwise good product catalog look like the photos were taken by three different people.
The One Mistake That Makes Skincare Photos Look Amateurish
More than any lighting issue, the single biggest thing that separates amateur from professional skincare photography is label legibility. If a buyer cannot read the brand name, the product name, and the key claims on your label in your listing photo, the photo is failing at its job even if the lighting is good.
Before you call any skincare shot done, zoom into the label on your phone screen at 200 percent. Check that the font is sharp and readable. Check that the label color is accurate to real life. Check that there are no white-out reflections sitting on the text. If any of those are failing, adjust your lighting angle before reaching for editing tools – this is almost always a light placement problem, not an editing problem.
Editing Your Skincare Photos for Listing-Ready Results
A well-lit shot at home still needs basic editing before it goes live: consistent cropping across the line, a slight exposure bump if the background is reading as off-white rather than pure white, and color correction if the packaging is not matching real life.
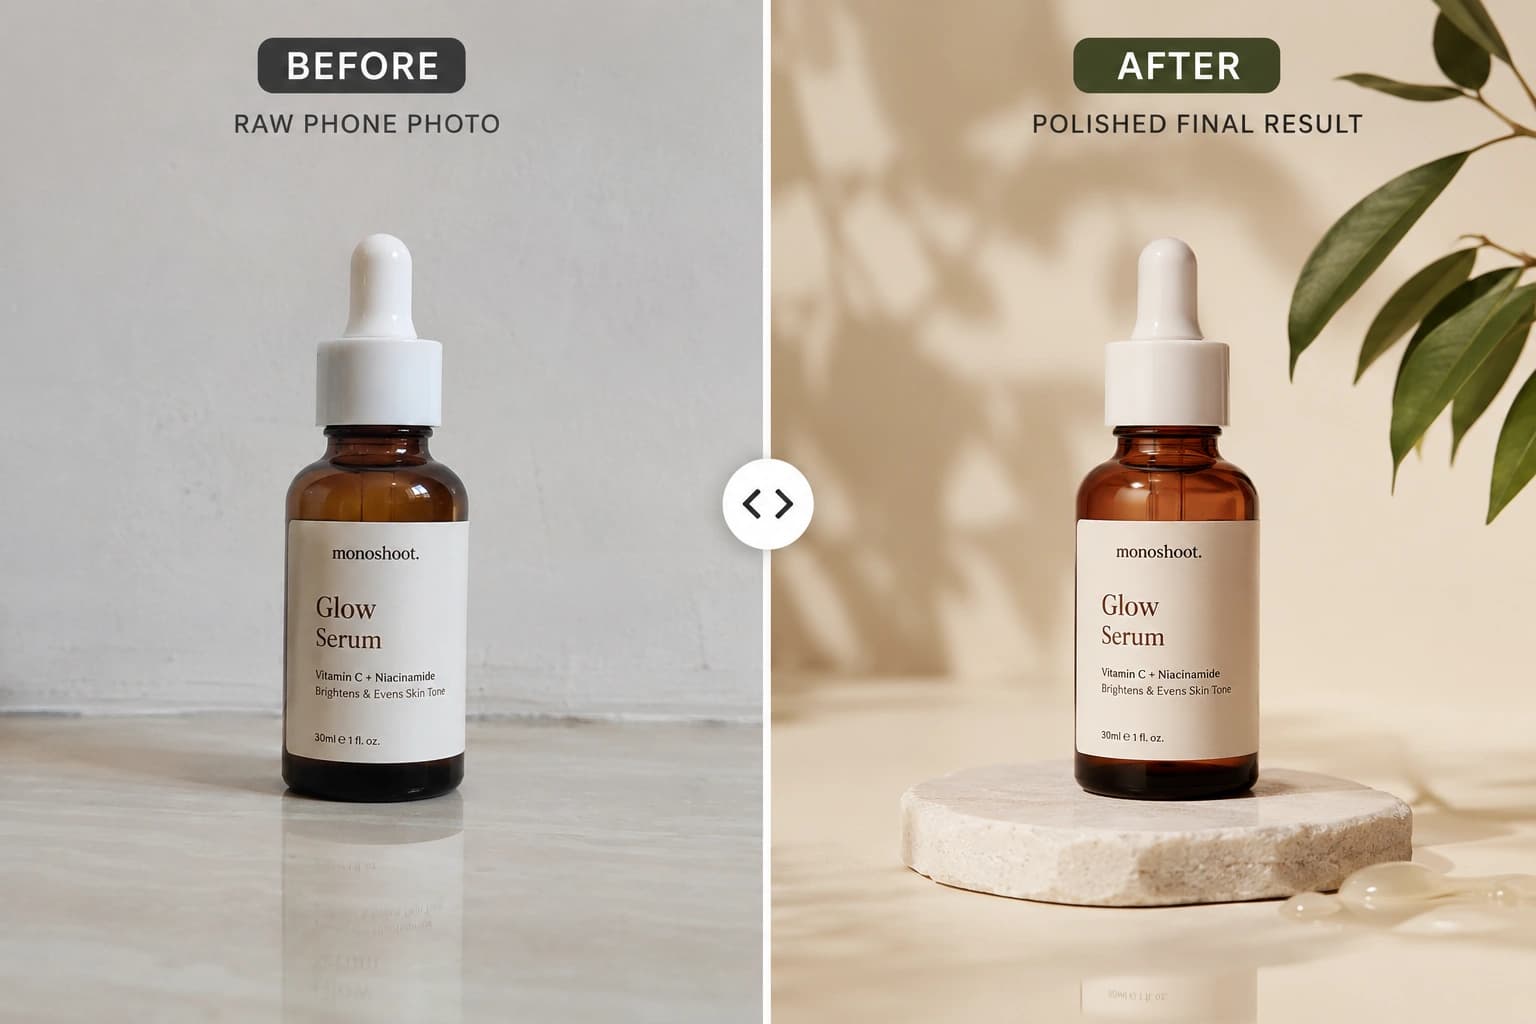
For sellers managing a small catalog, Lightroom Mobile handles this well and is free. For sellers managing dozens of SKUs – or adding new products regularly – applying that same consistent edit across every product is where the process breaks down. This is also where generic AI photo tools create a real problem for skincare brands. Tools that enhance or reimagine the background can shift your packaging colors, alter label text rendering, or change the finish of your product from matte to glossy in ways that do not match what customers receive. For a cosmetics brand, that mismatch between photo and product is a direct driver of returns.
Monoshoot was built specifically around this problem. Rather than regenerating or enhancing the product, it transforms the background and lighting context around an existing phone photo while keeping every detail of the product itself – label text, packaging color, finish, and form – exactly as it is in the original image. The result is a studio-quality listing photo from a phone shot, without the product fidelity issues that generic AI tools introduce.
Frequently Asked Questions
Can I photograph skincare products with just my phone?
Yes. Modern phone cameras are more than capable for skincare product photography at home, provided you use good lighting, a stable surface, and the right camera settings. The lens, focal length, and exposure control built into most current phones are sufficient for listing-quality images on Etsy, Shopify, Amazon, and similar platforms.
What is the best lighting for photographing skincare products at home?
Soft, indirect daylight from a window is the most reliable and accessible option. Avoid direct sunlight, which creates harsh reflections on glass and metallic packaging. If you are shooting under artificial light, use a daylight-balanced bulb (5000K-6500K) and set white balance manually to avoid warm color casts on white or neutral packaging.
How do I photograph glass skincare bottles without glare?
Avoid flash and direct sunlight entirely. Use soft, diffused window light coming from the side rather than directly overhead. Place a small piece of black card just outside the frame on the glass-facing side – this creates a dark reflection inside the glass that reads as depth. A white reflector on the opposite side fills in shadows without adding new hotspots.
What background should I use for skincare product photography?
White is the standard for marketplace main images and gives the cleanest, most consistent results. For lifestyle and social content, marble, linen, concrete, or slate surfaces work well depending on your brand’s positioning. Whatever you choose, use the same background consistently across your full product line.
How do I keep my skincare photos consistent across my whole product range?
Set up your equipment in the same position for every shoot. Use a tripod, mark your product placement with tape, and lock your camera settings before shooting. Shoot all products in the same session when possible. Consistent framing, lighting, and background is what makes a product catalog look like a brand rather than a collection of individual shots.
Why do my skincare labels look washed out or blurry in photos?
Washed-out labels are usually caused by direct light hitting the label surface and reflecting back into the lens. Angle your product slightly so the label is not directly perpendicular to the light source, or diffuse your window light with a sheer curtain. Blurry labels are almost always caused by camera movement at close range – use a tripod and a timer or remote shutter.
Final Thoughts
You do not need a studio to photograph skincare products at home well. You need to understand what makes each packaging material behave differently under light, build a repeatable setup that solves those problems, and apply the right camera settings for close-up, detail-critical shots. Get those three things right, and your phone produces listing photos that are clean, accurate, and consistent across your full range.
When you are ready to take your existing phone photos to a fully finished, studio-quality result – without touching a single detail of your product’s packaging, label, or finish – that is exactly what Monoshoot is built for.